Remote Disk
Starting with version 1.5, Disk Decipher provides support for remote storage. This allows access to disk images stored on a remote server. Disk Decipher will only download the parts of the disk image required to open the disk image and access the directories and files you select. This gives quick access to remote disk images independent of the size of the disk image.
For performance reasons, consider defragmenting your disk image occasionally. Downloading a file which is split in multiple fragments will obviously be slower than downloading a file in a single request.
To access a remote disk image simply tap the Add (+) button on the home screen of Disk Decipher, select Remote Disk and enter the URL of the remote disk image.

The first remote storage protocol implemented in Disk Decipher is the HTTP protocol.
HTTP
To access a disk image using the HTTP protocol, you need to store the disk image on a HTTP 1.1 compliant server. This can be a local Intranet web server if your iPhone/iPad is connected to a local wifi network, or a web server connected to the Internet if you want to access the disk image anywhere.
Disk Decipher uses the HTTP 1.1 Range feature to download only the necessary parts of the disk image.
In version 3.8.4 the HTTP remote storage provider has been replaced with a new implementation, built upon the Network framework. This re-allows Disk Decipher to communicate (unencrypted) with HTTP servers, a feature that stopped working when Apple introduced App Transport Security in iOS 9.0.
Since encrypted disks are already encrypted, the transport of the disk data from the server to your device does not need to be encrypted. Note that HTTPS provides more than just encryption of the disk data, like server authentication, message integrity and encryption of other data (like basic authentication header).
The HTTP implementation currently supports
- HTTP 1.1 persistent connections (this allows Disk Decipher to download multiple disk fragments efficiently, without the overhead of establishing a new connection for each individual fragment)
- HTTP redirects to another HTTP URL
- Basic authentication
The HTTP implementation currently does not support
- Other authentication schemes (e.g. Digest, Negotiate or NTLM)
If needed, the URL can be protected by username/password authentication. Disk Decipher will respond to authentication requests by asking for the username and password. If the URL contains a username, it will be shown as default username. The credentials will be saved until the disk is unmounted. You can also save the username and password securely in your keychain.
Note: in general, be careful with using basic authentication in combination with HTTP on an untrusted network. The username and password will be transmitted in clear-text. Consider using HTTPS instead of HTTP to encrypt the credentials automatically.
HTTPS
Version 1.7 of Disk Decipher adds support for the HTTPS protocol, i.e. HTTP encapsulated in SSL. The same requirements and comments that apply to HTTP also apply to HTTPS.
Disk Decipher actually contains two implementations for the HTTPS storage provider:
- One implementation based on the URLSession framework. This implementation requires the server to present a valid SSL certificate. Being based on the URLSession framework, this implementation supports several more HTTP authentication methods like Digest, Negotiate and NTLM.
- Another implementation based on the Network framework, which is the HTTP implementation (see above) augmented with TLS. This implementation allows additional trust for e.g. self-signed certificates.
On mounting a remote disk, Disk Decipher will try the URLSession implementation first. If the server certificate validation fails, you will be able to review the exact error and the certificate.
If the error is non-fatal (e.g. the certificate is not revoked) an option will be available to trust the certificate. This will enable the Network implementation for the remote disk.
Before trusting a certificate please read the Server Trust page.
If needed, the URL can be protected by username/password authentication. Disk Decipher will respond to authentication requests by asking for the username and password. If the URL contains a username, it will be shown as default username. The credentials will be saved until the disk is unmounted. You can also save the username and password securely in your keychain.
WEBDAV
Webdav uses standard HTTP or HTTPS connections to retrieve remote objects, so provided your webdav server conforms to the requirements listed above, Disk Decipher should just work if you provide the URL to the disk image.
Disk Decipher has been tested succesfully with the following cloud storage providers:
- Box, use URL https://dav.box.com/dav/... with ... the path to your disk image.
- Hidrive, use URL https://webdav.hidrive.strato.com/users/username/... with username your Hidrive username and ... the path to your disk image.
- Nextcloud, use URL https://host/path/remote.php/dav/files/username/... with path empty if Nextcloud is installed in the webroot, username your Nextcloud username and ... the path to your disk image.
Are you using WEBDAV to connect to another cloud storage provider? Let me know and I'll add the provider to this list to help others.
Here is a list of other WEBDAV URLs. Note that these URLs have not been tested with Disk Decipher. Please let me know if you successfully use one of these URLs and I will add the URL to the above list.
NFS
Disk Decipher 3.10 includes support for accessing encrypted disks stored on an NFS server. These features are supported:
- NFS v3
- IPv4 (TCP and UDP)
- UNIX (AUTH_SYS) authentication
- Write support
URL format
To add an NFS disk, select Remote Disk from the Add Disk view, and enter an URL with this format:
nfs://nfs.server/path/to/export//path/to/disk
with nfs.server the hostname or IP address of your NFS server. For example, to access the mydisks/disk.tc inside the exported directory /home/me on the NFS server 192.168.1.14, you would use URL
nfs://192.168.1.14/home/me//mydisks/disk.tc
Please note the double slash (//) in the URL separating the filesystem exported by the NFS server from the location of the disk inside the filesystem. If there is no double-slash separator in the URL, the last slash will be taken as separator.
Unprivileged source port
Note: Disk Decipher obviously does not run as root on your device, which implies that it can not use a privileged source port (< 1024) when connecting to the NFS server. Please make sure your NFS server allows connections originating from all source ports.
For instance, on a macOS NFS server, include this line in /etc/nfs.conf
nfs.server.mount.require_resv_port = 0
On Linux, you can add the "insecure" option to the filesystem entry in /etc/exports.
Extensions
Several extensions of NFS support are possible, like NFS 4.1 support, or other authentication schemes. Do let me know if you are interested in such extensions.
Dropbox

Version 1.8 of Disk Decipher adds support for Dropbox. Disk Decipher uses the Dropbox API to access disk images stored in your Dropbox account.
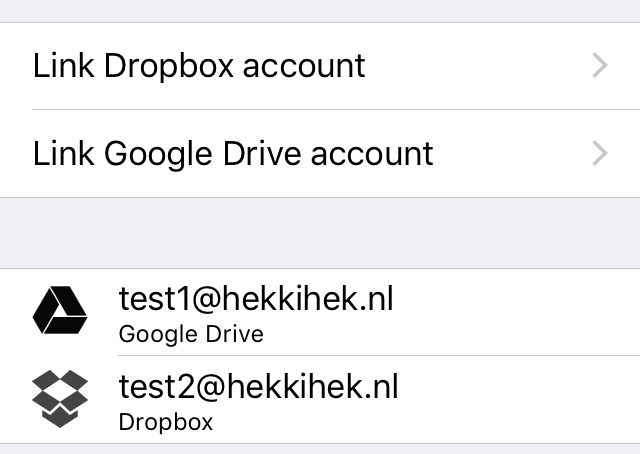
To use this feature, you need to link Disk Decipher to your Dropbox account by opening the settings dialog, and selecting "Storage provider accounts". Tapping "Link Dropbox account" will initiate the familiar procedure to link a Dropbox account.
Note: Disk Decipher supports linking multiple Dropbox accounts. If you have access to multiple Dropbox accounts, tap "Link Dropbox account" for each account. This will enable you to access disk images stored in these accounts.
After successfully linking a Dropbox account, the account will be shown with its e-mail address in the list of storage provider accounts:
After linking your Dropbox account you can easily add a disk image stored in your Dropbox account from the main Disks view:
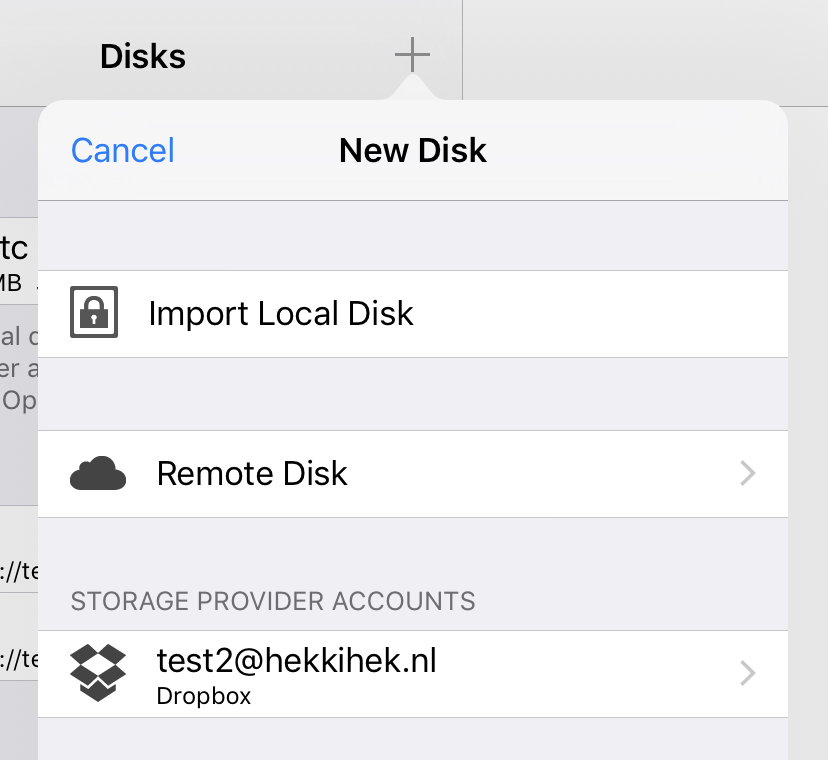
Just tap the Dropbox account, and a familiar file picker will enable you to select the disk image stored in your Dropbox account. The disk image will be added to the list of available remote disks in the main view of Disk Decipher:
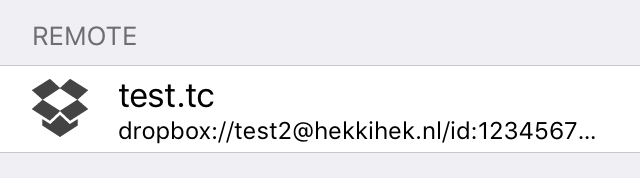
The semi-random string shown at the end of the URL is the fileID of the disk image in your Dropbox.
Google Drive
Version 2.3.0 of Disk Decipher adds support for Google Drive. Disk Decipher uses the Google Drive API to access disk images stored in your Google Drive account.
Detailed instructions for adding a disk image stored on Google Drive as Remote Disk are available on this page.
Microsoft OneDrive

Version 2.9.0 of Disk Decipher adds support for Microsoft OneDrive and OneDrive for Business. Disk Decipher uses the Microsoft Graph API to access disk images stored in your Microsoft OneDrive account.
Adding / accessing an encrypted container stored in your OneDrive account is similar to Dropbox (see instructions above). Just add your Microsoft OneDrive account under Settings - Storage provider credentials, then add the encrypted container using the + button at the top of the Disks list.
Box

Version 2.9.2 of Disk Decipher adds support for Box. Disk Decipher uses the Box API to access disk images stored in your Box account.
Adding / accessing an encrypted container stored in your Box account is similar to Dropbox (see instructions above). Just add your Box account under Settings - Storage provider credentials, then add the encrypted container using the + button at the top of the Disks list.
pCloud

Version 3.15.4 of Disk Decipher adds support for pCloud. Disk Decipher uses the pCloud API to access disk images stored in your pCloud account.
Adding / accessing an encrypted container stored in your pCloud account is similar to Dropbox (see instructions above). Just add your pCloud account under Settings - Storage provider credentials, then add the encrypted container using the + button at the top of the Disks list.
Note
In April 2025, pCloud removed an important part of their API that allowed Disk Decipher to enable write support for disk images hosted on pCloud. As this part of the API is no longer available, Disk Decipher 6.0.4 introduces updated pCloud support, restoring read only access to your disk images hosted on pCloud.
S3

Version 4.1.0 adds support for S3 storage providers. Amazon introduced the S3 object storage and is therefor the best known S3 storage provider. Several other storage providers (like StorJ, Wasabi Hot Cloud Storage and Microsoft Azure Blob Storage) support the same S3 API. Disk Decipher uses the S3 REST API, so you can use this feature with any storage provider that accepts it.
The S3 API does not support partial updates to files, so disks will always be mounted readonly.
To access your S3 storage, open Settings - Storage provider credentials, and add your S3 credentials
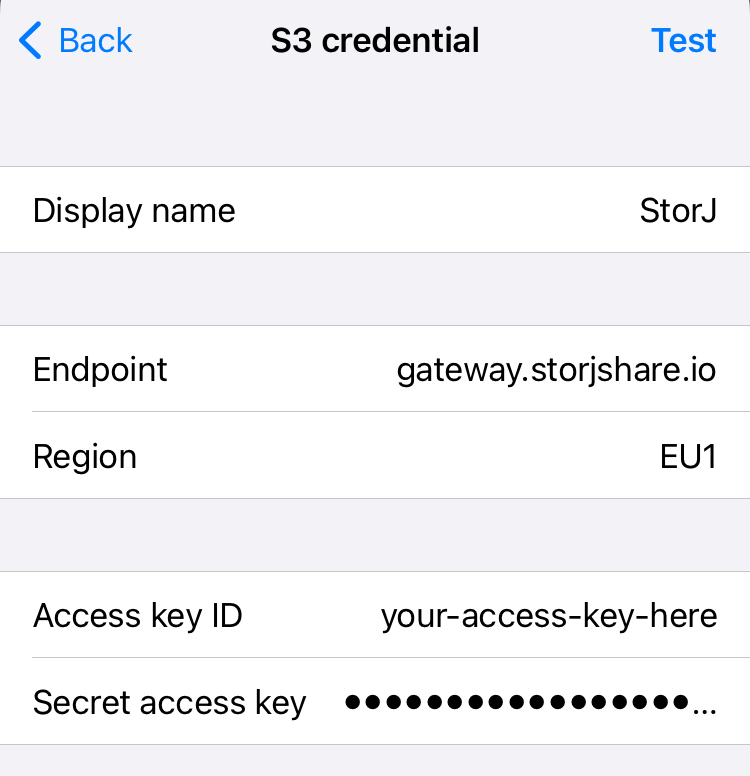
- Display name: enter any name you want, it will be shown in the app afterwards when adding a disk using these credentials. Do not refer to a specific S3 bucket, as the credential might have access to multiple buckets.
- Endpoint: enter the hostname of your S3 endpoint. Do not include the https:// prefix, just the hostname. If the service is not using the default port 443, you can add it using the host:port syntax.
Do not include a bucket name in the endpoint name, but do include the region if required by your S3 provider (like Amazon). - Region: specify the region, like "us-west-2" or "EU1". This should be provided by your S3 provider.
- Access key ID and Secret access key: also provided by your S3 provider.
Tapping the "Test" button will verify the connection with your provider. If successful, the credentials will be stored, and you will be able to add a disk using these credentials from the main Disks view.
Disk Decipher has also been tested with IDrive e2. The endpoint on IDrive is unique to the access key at time of creation, the region is ignored (use any string you like).
SugarSync

Version 5.2.0 of Disk Decipher adds support for SugarSync. Disk Decipher uses the SugarSync API to access disk images stored in your SugarSync account.
Adding / accessing an encrypted container stored in your SugarSync account is similar to Dropbox (see instructions above). Just add your SugarSync account under Settings - Storage provider credentials, then add the encrypted container using the + button at the top of the Disks list.
Filen


Version 6.0.3 of Disk Decipher adds support for Filen. Disk Decipher uses the Filen API to access disk images stored in your Filen account.
Adding / accessing an encrypted container stored in your Filen account is similar to Dropbox (see instructions above). Just add your Filen account under Settings - Storage provider credentials, then add the encrypted container using the + button at the top of the Disks list.
- Version 2 and 3 of the Filen authentication and encryption protocols are supported (version 3 support requires Disk Decipher 6.0.4 or higher)
- Sparsebundle disk images are not yet supported, all other disk formats should work
- Two factor authentication is supported
- Mounted disks are readonly as the Filen API does not support partial updates
Other protocols
The remote storage support can be extended to other protocols / cloud storage providers. If you like to see a specific protocol implemented first, then please let me know.